Tuesday, January 8, 2013

Healthy Snacking: Homemade Granola

You ever just get a craving for something as soon as you wake up? Maybe it's because I'm obsessed with food, but I woke up and instantly thought about crunchy granola on top of Greek yogurt. Not all cravings come that healthy so this was a treat to be able to say yes! right away to. With a new year upon me, and a few extra holiday pounds upon me too, time to get back in gear and treat my body a bit better. After week one of healthy eating, I can say the cravings for naughty foods are pretty much gone. I had a major detoxing headache for 2 days but all systems seem to be clear.

I was pleasantly surprised at how simple this snack was to whip up with things that I had on hand. Easy to adapt with other nuts, grains, raisins and seeds too! This recipe I adapted from one I found on pinterest for peanut butter granola from Shape magazine. I had some almonds and coconut on hand that I thought would taste Delish (I was right) so I added those and some Epicure loving.


Ingredients:
Makes four 1/4 c servings
2 tbsp. creamy peanut butter
2 tbsp. honey
2 tsp. VE maple spice
1/4 tsp. vanilla extract
3/4 c. oats


1/4 c. Both Sweetened shredded coconut and slivered almonds

VE cinnamon sugar grinder used to taste.

Directions:
Preheat oven to 325 degrees. Line your cookie sheet with parchment or VE silicone baking mat and set aside. Combine peanut butter and honey in a bowl and microwave until peanut butter melts (approximately 20 seconds).


Add vanilla and Maple Spice to peanut butter mixture. Combine oats, coconut and almonds and add peanut butter mixture until it's all covered. Spread it all on the cookie sheet and grind some cinnamon and sugar on top. Bake for 7 -8 minutes until granola is slightly browned. Granola will get more crunchy as it cools.

Sprinkle it on some fat-free Greek yogurt, fresh or frozen (but thawed) raspberries and blueberries and you have a healthy snack or breakfast your body will thank you for!


Monday, November 12, 2012

Mocha cheese "truffles"

I stumbled up one this recipe on pinterest and tucked it away knowing exactly how I planned to "epicurize" this little dessert. I messed it up slightly because I used spreadable cream cheese instead of the block. This did not impact the taste of theses sinfully delicious little bites but rolling them into balls was a bit tricky because the cream cheese was not as stiff as it should have been. So..through trial and error I can say without a doubt, spreadable cream cheese is not the best choice. However, my hubby A, moaned and groaned (in a good way!) and swore up and down (in a good way!) that these little bites might just be the best things I've ever made. Ok, so personally, I feel it may have been a slight over exaggeration. They were pretty darn good though and ultra easy. A great idea for the approaching holiday season to add to your festive spread. I know they will be added to mine.


Ingredients

1 block of cream cheese

1 package of Oreo cookies

2 tbsp of Mocha Cheeseball Seasoning

1/2 cup of VE Dark Belgian Chocolate, melted


Directions

1. Crush up your Oreo cookies till it kind of looks like soil

2. Mix your cream cheese and mocha cheeseball seasoning, Into your crushed cookies

3. Form into balls and place on a cookie sheet lined with parchment or if you have one, VE silicone baking mat.

4. Melt your chocolate on low in a stainless steel bowl placed in some hot water. Dark chocolate is best done this way rather than the microwave.

5. Pour warm chocolate into a piping bag or a ziplock bag like I used with the corner snipped. I have yet to purchase one myself but Epicure also carries this handy dandy chocolate decorating tool that would work well too!

6. Swirl with a generous amount of chocolate and chill in the fridge.

7. I dare you to try and eat just one!

Note: I just saw in the most recent Insiders Report for all the new Presidents Choice products for the holidays that they have candy cane crushed up in the middles "Oreos". How good would those be in this? I am SO going to try those next.


Thursday, October 11, 2012

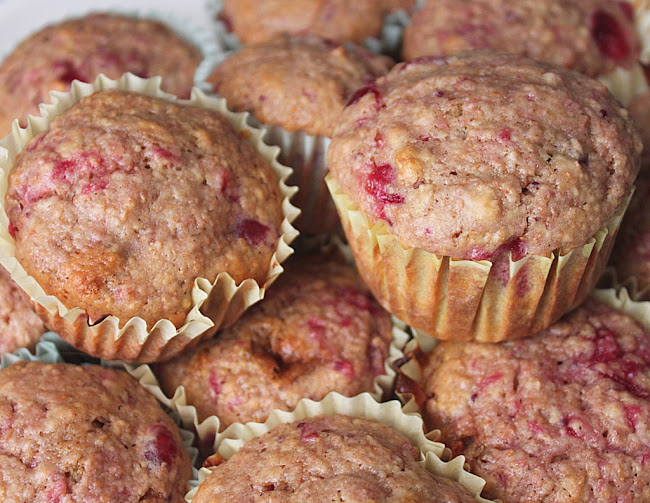
Cranberry Bran Muffins (using leftover cranberry sauce from Thanksgiving)


A beautiful Thanksgiving was had by all, the table was set with glittery pumpkins and fall leaves the kids and I collected on our brisk afternoon walk. The Turkey was browned on the outside, moist on the inside. I made my first ever cranberry sauce from scratch. I seriously didn't realized how simple it was, and now that I know, there is no excuse for purchasing that canned gelatinous cranberry jelly stuff. Plus there's this really neat popping sound the cranberries make when the are simmering in the sugar and water, the kids got a kick out of listening to them pop. I made a big bowl of it and had lots leftover. After the big event I got to thinking...how can I repurpose this cranberry goodness? I came up with the idea to add it to muffins, tweaking an existing recipe from all-bran.ca for cranberry apple muffins.

For these muffins you'll need some All-Bran cereal
1 cup of leftover cranberry sauce
Mix All-Bran with the milk in a medium bowl, it will look like you are preparing breakfast for a giant, or my husband. Let it get good and soggy, just like you don't like your cereal to be in the morning. Set aside.

In a large bowl mix up your dry ingredients, flour, brown sugar, baking powder and spices. I used VE Poudre Douce ( one of my all time favorites) its a sweet and spicy blend that remind me of apple pie spice. I also used some VE Ground Cinnamon.


Mix your eggs into the soggy cereal, warning: this will look gross! Trust me that it all comes together beautifully.

Finally gently add your cereal sog to the dry ingredients, stir till just combined. Fold in your cranberries.

Portion out into lined muffin tins and bake till tops spring back when you touch them.
Enjoy with a cuppa tea or coffee for breakfast.


Ingredients

1 1/2 cups All-Bran Original* cereal
1 cup milk (1%)
1 cup all-purpose flour
1/2 cup lightly packed brown sugar
4 tsp baking powder
1 tsp VE Ground Cinnamon
1/2 tsp each, VE Poudre Douce and salt
2eggs
1/4 cup canola oil
1 cupcranberry sauce


Directions
1. In medium bowl, combine cereal and milk. Let stand for 2 minutes or until cereal softens.
2. In large bowl, combine flour, sugar, baking powder, cinnamon, poudre douce and salt. Set aside.

3. Add eggs and oil to cereal mixture; beat well. Add liquid mixture to dry ingredients, stirring only until just combined. Fold in cranberries. Portion batter evenly into 12 (2½”/6.5 cm) non-stick muffin pan cups, lightly coated with cooking spray or lined with paper cups.

4. Bake in 400°F (200°C) oven for 20 minutes or until tops spring back when lightly touched.


Tuesday, October 2, 2012

Easy Roasted Brussel Sprouts with Bacon and Parmesan

Thanksgiving in Canada is this weekend and I simply love this holiday. There's this smell in the air that I wish I could capture in a bottle. Turkey and stuffing and pie oh my... This year I am hosting my first ever Thanksgiving dinner at our new house. We finally have room to invite everyone over! In planning the menu I am going to add a few traditional dishes that I remember eating as a kid. For instance, there's the always popular, ever elusive, always comforting, pea casserole made with mushroom soup that I loved as a kid, it wouldn't be thanksgiving without that darn casserole. I also would like to introduce new traditions to my stlll young family, so this year I will welcome a new dish to the table. The best thing is this side dish is simple to prepare and delicious. I believe even a brussel sprout naysayer will enjoy this.

Start with a bunch of fresh Brussel sprouts and trim off the brown ends and pull off any yellow or discoloured outer leaves. Cut in half length wise.

Next lay them cut side down with a little breathing room around the sprouts. If you don't give them space, crowded sprouts will get too steamy and turn to mush. Drizzle with a little olive oil.

Roast in a 400 degrees F oven until tender, about 25 mins. Then liberally sprinkle on VE Smoky Bacon topper, 1/4 cup of Parmesan cheese, VE Herb and Garlic Sea Salt and fresh VE Ground Pepper to your own taste. Then put back in the oven for another 10 mins.


Sprouts should be tender and golden brown. Finish off with some more fresh parmesan if you please. Serve immediately.

Happy Thanksgiving!


Sunday, September 23, 2012

Cheddar Bay Biscuits Copycat Recipe

We've all been there, or maybe its just me. You sit down at Red Lobster and out come those steamy, soft, flakey, buttery, cheesy, garlicky biscuits and you can't stop at just one or even two. Your monster size entree arrives and you can barely finish it cause of all those darn good cheddar bay biscuits you ate pre dinner. I adapted this recipe for Red Lobsters Cheddar Bay Biscuits, from a site called top secret recipes. I have to say right off the bat, no holding back here...these biscuits were delicious. Just like Red Lobster I swear it! Super Duper easy too. Simply start with a box of bisquick....

In a large mixing bowl add bisquick mix and cold butter


Using a fork or your hands, mix the butter into the mix. Don't over mix, there should be pea sized butter chunks throughout. That's what makes them all flakey and soft.

Then add cheddar cheese, VE seasoning for roasted garlic aioli and milk. Mix until combined with your hands. Drop on baking tray lined with the VE silicone baking mat. Bake until lightly browned.


After you take the biscuits from the oven melt topping butter in your microwave. Stir in VE Herb and Garlic dip mix.

Use your herb and garlic butter to spread on top of the biscuits using a brush.

I served them warm from the oven on the side of our spaghetti dinner tonight and they were just perfect.

Ingredients

2 1/2 cups Bisquick baking mix

4 tablespoons cold butter
1 heaping cup grated Cheddar cheese
3/4 cup cold whole milk
1/2 teaspoon VE seasoning for roasted garlic aioli

Brush on Top
2 tablespoons butter, melted
1 teaspoon VE herb and garlic dip mix

Instructions

1. Preheat oven to 400

2. Combine Bisquick with cold butter in a medium bowl, using a fork or your hands.You don't
want to mix too much. There should be small chunks of butter in there that are about the size of peas. Add Cheddar cheese, milk, and 1/4 teaspoon VE seasoning for roasted garlic aioli. Mix by hand until combined, but don't over mix.

3. Drop approximately 1/4-cup spoonfuls of dough onto a baking sheet lined with VE silicone baking mat. Bake for 15 to 17 minutes or until the tops of the biscuits begin to turn light brown.

4. When you take the biscuits out of the oven, melt 2 tablespoons butter in a small bowl in your microwave. Stir in 1 teaspoon of VE herb and garlic dip mix. Use a brush to spread this herb and garlic butter over the tops of all the biscuits.


Monday, September 17, 2012

Sunday Supper: Pasta e Fagioli with sausage

Sunday suppers when I was growing up were always special. Roast beef with Yorkshire pudding, dad always made his famous whipped smooth mashed potatoes that were like velvet. Sometimes it was ham or a big pot of simmering pasta sauce. Regardless, it was a day when no matter what was going on, we came together for a hot hearty meal as a family and the house smelled of comfort all day. I love the idea of Sunday Suppers, but it does not mean it has to be a roast with all fixings. It's about bringing the family together, enjoying comfort food. This Sunday I decided to tackle my version of pasta e fagioli.

Traditional pasta e fagioli is a vegetarian Italian soup meaning "pasta and beans." I had some Italian sausage on hand so I adapted it into the soup which did in fact make it heartier and it was a great simple, healthy and comforting Sunday supper served with garlic toast. This is one of those everything but the Kitchen sink soups where really you could use whatever beans and veggies you have on hand. For this recipe I started with a bulb of fennel, some carrots and an onion.

Chop up 1/2 cup carrots, 1/2 cup fennel, 1 small onion

In a large pot sautée the veggies with about a pound of Italian sausage casings removed.


Add a generous tablespoon of VE Marinara sauce mix, typically used to season pasta sauce but has a wonderful Italian aroma that is perfect for this soup. 2 cloves fresh crushed garlic. Another generous tablespoon of VE Tomato Parmesan Cheeseball mix and some freshly ground VE Herb and Garlic Sea Salt.

Add 4 cups prepared VE chicken boullion, 1 (28 oz) can of diced or crushed tomatoes and 1 can (18 oz) of rinsed canellini or navy beans. Bring to a boil.

Stir in 1 cup of small pasta, traditionally dialini is used but I had some elbow macaroni on hand and used that. Lower the heat and simmer until al dente.


Serve with a sprinkle of Parmesan, a drizzle of evo ( extra virgin olive oil) and some bread on the side for mopping up all that goodness. Hubby went up for thirds and the kids loved it too! Celebrate some old traditions or create some new ones, with Sunday Supper!


Wednesday, September 12, 2012

Currently Craving: Poutine Chips

There's this magical time of the day when the children are nestled inside of their beds, and last night mama had visions of potato chips dancing in her head. I have a weakness for chips, I admit I am simply powerless over them. Pop open a bag and it's over. For that reason, I don't allow myself to even enter the chip aisle at the grocery store. So what does a girl do when it's late night and she's craving a salty crispy snack?

I first met the chipster when I attended an epicure party back in February. At that moment I heard the angels sing! You mean I can have chips, without the fat!?! It's not possible...oh but it is. If you're new to Epicure Selections I'll explain the chipster. This silicone tray makes fat free chips in the microwave in 5 mins. No seriously! crispy and delicious. For this snack you'll need only three things: your chipster, your slicer and your poutine seasoning.

Chipster, Ceramic Slicer and Poutine Seasoning for Chips

Slice your potato

Lay flat and even on the chipster, sprinkle liberally with the poutine seasoning. Put in the microwave for about 5 mins. Depending on your microwave it could use about 7 to get crispy.

Add your favourite late night tv show and enjoy all the taste of poutine without the heart attack!